
A Permanent Retirement Account Number (PRAN) is a unique 12-digit identification number allotted to individuals enrolled in the National Pension System (NPS) in India. The PRAN is essential for tracking and managing the pension contributions of individuals throughout their working life, ensuring that they receive a secure and stable pension post-retirement.
Downloading your PRAN card online is quick and easy, and this webpage will show you how to do it step by step.
Features & Benefits of PRAN Number
Here are the features and benefits of having a PRAN:
- Unique Identifier: Your PRAN is a one-of-a-kind number that sets your NPS account apart from others.
- Portability: You can carry your PRAN with you even if you change jobs or cities. Your retirement savings move with you.
- Investment Tracking: You can easily monitor your NPS investments, returns, and account balance using your PRAN.
- Tax Benefits: Investing in NPS offers tax benefits under Section 80C and 80CCD of the Income Tax Act.
- Pension Security: Regular contributions to your NPS help build a steady income source for your retirement.
To download your PRAN, you need to first apply for a PRAN. When applying for an NSDL PRAN, you have the option to use either your PAN or Aadhaar number. Both methods are outlined below.
Are you looking for a personal loan?

Get Personal Loan Online Up to ₹35 Lakhs
By entering your number, you're agreeing to Terms & Conditions & Privacy Policy.
Apply for a PRAN Number Online Through PAN
To open a PRAN online as an NPS subscriber, you can visit the official website of the National Securities Depository Limited (NSDL).
Here are the points to consider when applying for a PRAN Number through a PAN card:
- You must have a bank account with the empanelled Bank for KYC verification during subscriber registration through eNPS.
- Your KYC verification will be done by the Bank selected by you during the registration process.
- The name and address provided during registration should match the bank records for KYC verification.
- If the details don’t match, the request is liable for rejection. In case of KYC rejection by the selected Bank, contact the Bank.
- Fill up all the mandatory details online.
- Upload your scanned photograph and signature in *.jpeg/*.jpg format, file size between 4kb – and 12kb.
- You will be routed to a payment gateway to make the payment towards your NPS account from Internet Banking
Apply for a PRAN Number Online Through Aadhaar
NPS KYC can be completed using Aadhaar OTP (One Time Password) authentication. Here is what you need to know:
- The Aadhaar OTP is sent to the mobile number registered on the Aadhaar database.
- Your demographic details and photo will be fetched from the Aadhaar database and automatically populated into the online form.
- You need to fill up all the mandatory details online.
- You would be required to upload your scanned signature (in *.jpeg/*.jpg format with a file size between 4kb – and 12kb) as part of the registration process.
- If you wish to replace the photo obtained from Aadhaar, you may upload a scanned photograph.
- You will be routed to a payment gateway for making the payment towards your NPS account from a Debit/ Credit card or Internet Banking.
Steps to Apply for a PRAN Number Offline
The applicants need to visit a PoP (Point of Presence) empanelled under the National Pension System (NPS) to apply for the PRAN card offline. You have to fill out the NPS Application Form Annexure S1, which includes:
- The personal details
- The employment details
- The nomination details
- Details of the scheme
- Subscriber’s declaration to the Pension Regulatory Fund and Development Authority (PRFDA).
After filling out the PRAN application form, the applicant needs to submit it to the concerned official.
Don’t know your credit score? You can find out for free!

Steps to Activate a PRAN Card
The easiest method to activate a PRAN card is by digitally signing the document using the “eSign” feature. If you have applied for a PRAN card using Aadhaar number, you can activate it by following these steps:
Step 1: Select the ‘eSign’ option on the eSign/Print & Courier page.
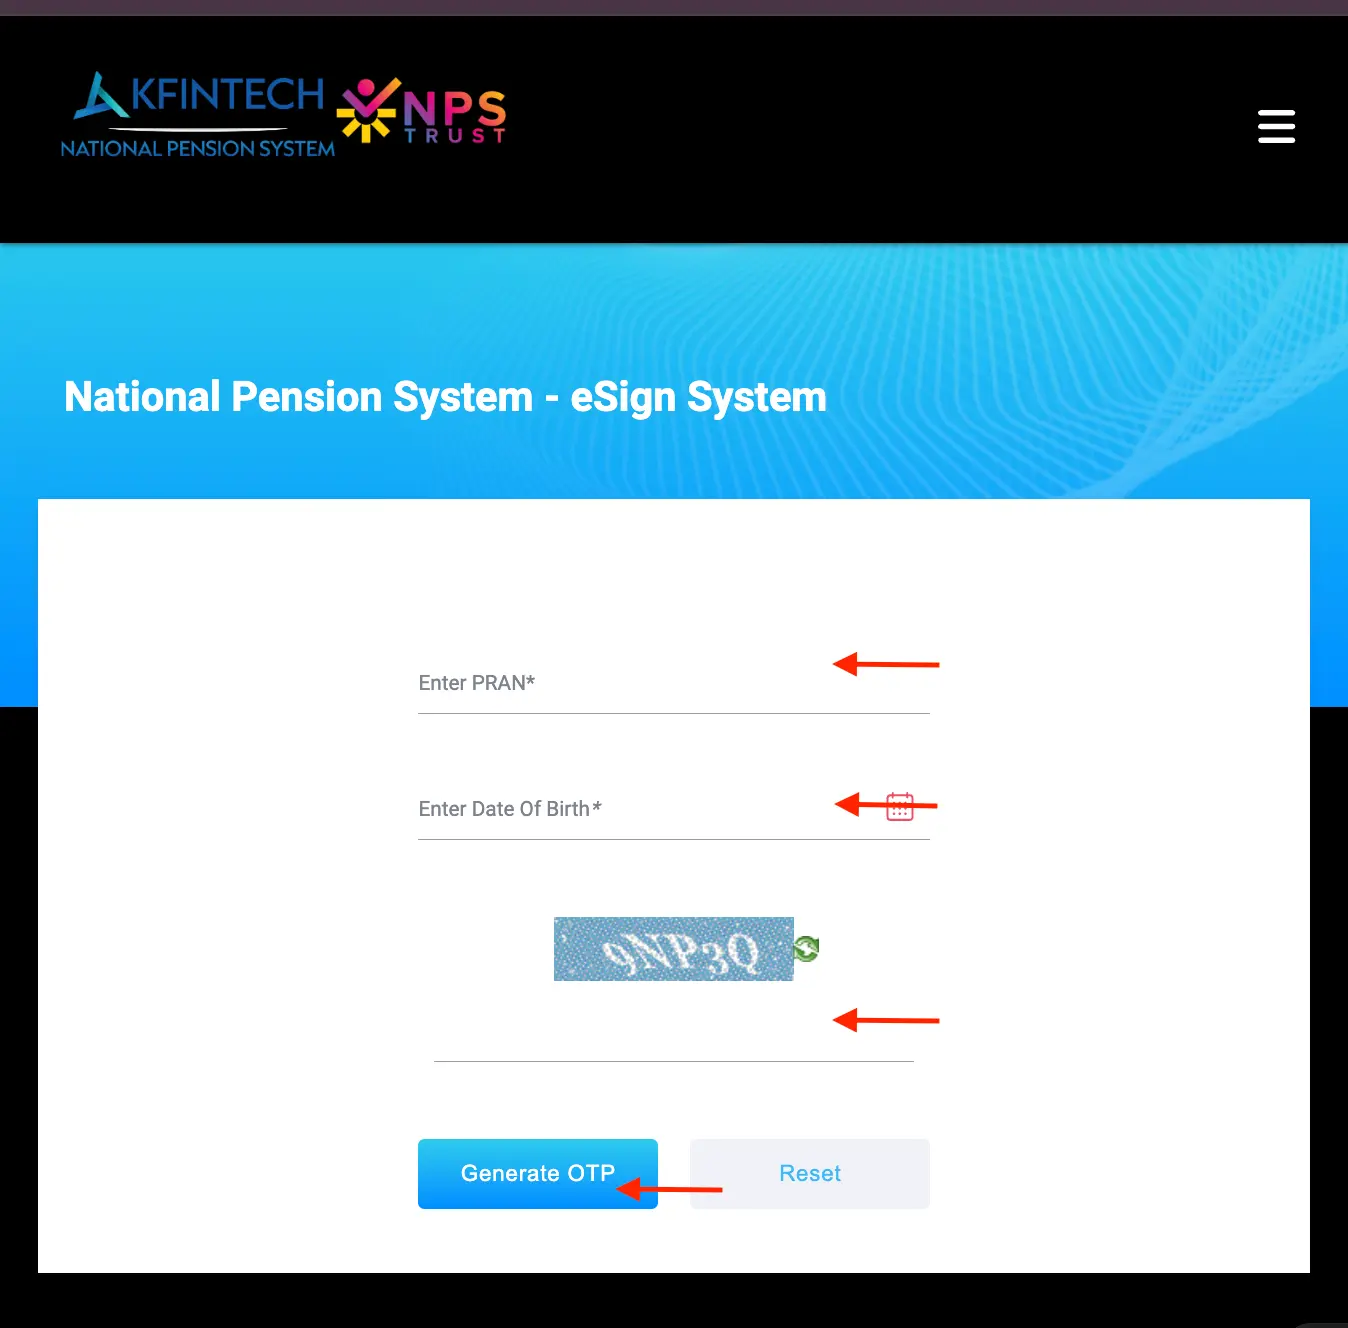
Step 2: Enter the PRAN, Date of Birth, and Captcha and click on ‘Generate OTP’.
Step 3: An OTP will be sent to your mobile number registered with Aadhaar for authentication.
Step 4: After authentication using the Aadhaar OTP, the registration form will be successfully eSigned, and a confirmation message will be displayed.
Step 5: Once the document is eSigned, you do not need to send the physical copy of the form to CRA for PRAN card activation.
Step 6: The eSign service is chargeable at ₹25.90 plus applicable service tax (including UIDAI charges of ₹20).
Do you need an instant loan?
Get Personal Loan Online Up to ₹35 Lakhs By entering your number, you're agreeing to Terms & Conditions & Privacy Policy.
You have the option to have a printed PRAN card to be delivered to you through the “Print and Courier” option on the “eSign / Print and Courier” page. Here is how:
- Step 1: Select the ‘Print & Courier’ option on the eSign/Print & Courier page.
- Step 2: Print out the completed form and attach your photograph in the specified area without using staples or pins.
- Step 3: Sign in the designated signature blocks.
- Step 4: After receiving your PRAN, submit the completed PRAN card application form with a photograph to the relevant CRA (Karvy/NSDL) within 30 days of PRAN card allotment.
Steps to Download PRAN Card
You can download your ePRAN (Electronic PRAN) card by following the steps:
- Step 1: Log into your NPS account.
- Step 2: Select the ‘Print ePRAN’ option.
Note: Printing an ePRAN is free, but requesting a physical PRAN card may incur charges plus GST.
Steps to Track PRAN Card Status
You can conveniently track the status of your PRAN card online. Here are the steps:
Step 1: Visit the NPS-NSDL portal by searching “Track the status of PRAN Card”.
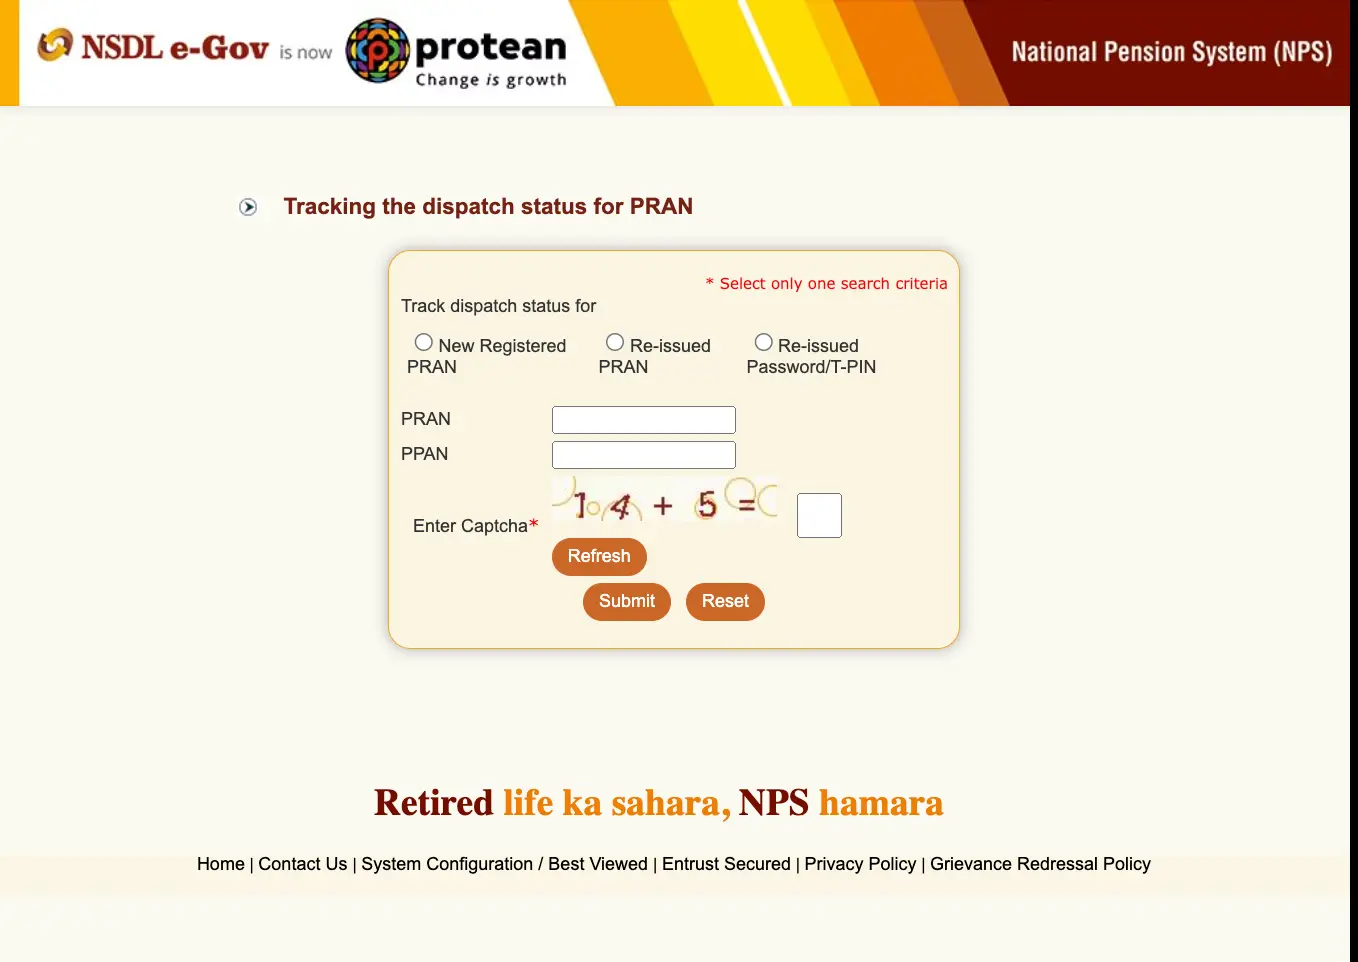
Step 2: Enter the PRAN and the captcha on the website.
Step 3: Click “Submit” to view the status of the PRAN card.
Steps to Access ePRAN Through DigiLocker
Accessing your ePRAN through DigiLocker is simple. Follow these steps to easily access your ePRAN:
- Step 1: Visit the DigiLocker website and log in using your mobile number and Aadhaar card.
- Step 2: Enter the 6-digit security code provided.
- Step 3: A 6-digit OTP will be sent to your registered mobile number. Input the OTP and submit it.
- Step 4: In the left menu, click on the “Search Documents” option.
- Step 5: From the central government drop-down menu, select PFRDA.
- Step 6: You will be redirected to the ePRAN page.
- Step 7: Fill in all the required information and click to retrieve the document.
Tax Benefits of Getting a PRAN Card
Here is what you need to know about the tax benefits of getting a PRAN.
- Section 80C Deductions: Contributions to NPS qualify for deductions up to ₹1.5 lakh under Section 80C.
- Additional Deductions: An extra deduction of up to ₹50,000 is available under Section 80CCD(1B) for NPS contributions, which is over and above the ₹1.5 lakh limit of Section 80C.
- Tax-Free Returns: The returns generated from the NPS are tax-free, enhancing the overall benefit.
- Withdrawal Tax Benefits: Upon maturity, 60% of the corpus can be withdrawn tax-free, while the remaining 40% must be used for purchasing an annuity.
Documents Required to apply for a PRAN include PAN card, Aadhaar card, Scanned copy of a cancelled cheque, scanned signature, scanned photograph and scanned passport (mandatory for NRI applicants). Ensure that the scanned documents mentioned should have a file size ranging from 4kb to 12kb and must be in .jpeg/.jpg format.
Besides PRAN card download, you can also check other related topic links given below:
Do you need an emergency loan?
Get Personal Loan Online Up to ₹35 Lakhs By entering your number, you're agreeing to Terms & Conditions & Privacy Policy.